If you’re considering a switch from glass bottles to aluminum cans for your beverages, here are a few reasons why aluminum cans might be the better choice:
- Lightweight and Convenient: Aluminum cans are lighter and more easily portable, making them a great option for on-the-go activities such as picnics, camping, or outdoor sports.
- Durable and Practical: Unlike glass bottles, aluminum cans are unbreakable and therefore more suitable for transportation and storage.
- Eco-Friendly: Aluminum cans are 100% recyclable and can be recycled endlessly without losing their quality. This makes them a more environmentally responsible option compared to glass bottles, which are not as easily recyclable.
- Freshness Guaranteed: Aluminum cans provide an airtight seal, which helps to keep beverages fresher for longer. This is especially important for carbonated drinks, which require the preservation of carbonation levels.
- Economical: Aluminum cans are cheaper to produce and transport than glass bottles, making them a more cost-effective option for both manufacturers and consumers.
Have you ever wondered how these cans get filled with beer? We will guide you through each step of the journey from empty to full and back again.
Step 1: Loading the Machine with Empty Cans
The process starts with rows of empty cans. Depending on the brewery or copacker’s canning machine, the cans may be fed into the machine in two ways:
Automatic canning: In a high-output automated system, a depalletizer is used to load the empty cans onto a conveyor belt in groups.
Manual canning: For manual or semi-automatic systems, the operator must feed each empty can into the machine by hand.
Regardless of the method, the empty cans arrive on the conveyor belt without tops, ready to be filled. In some cases, copackers may use pre-printed cans to skip the labeling step, but most of the time, the cans are blank, with labels added later.
Step 2: Rinsing the Interiors of the Cans
The cans are thoroughly washed before filling, whether they are brand new or recycled. They travel down a conveyor belt and into a twist rinser that looks like a rollercoaster for cans. The twist rinser flips the cans upside down and blasts them with sanitizing water, cleaning the interiors, before returning the cans to their upright position.
Step 3: Purging the Oxygen
As the cans are open, they are full of oxygen and residual water. To remove this, carbon dioxide (CO2) is pumped into each can to purge the oxygen and prevent it from affecting the beer’s flavor and shelf life.
Step 4: Filling the Cans After purging the oxygen.
The cans are ready to be filled with beer. A Teflon tube descends from above, filling the cans with the desired beer. The number of cans filled at once depends on the size and capacity of the filling station, with more filler heads allowing for more cans to be filled at once. Most machines pour slightly more than the required amount into each can to account for spillage. GX Canning offers end-to-end capabilities to fill 12oz. standard, 12oz. sleek, 16oz. standard cans, and other sizes upon request.
Step 5: Adding the Ends
The top part of the can, the end or lid, is dispensed from above and clangs onto the open cans. Some setups may have a vacuum sealing machine that sprays nitrogen into the can as the lid is added, expelling any remaining oxygen.
Step 6: Seaming the Cans
A seamer fastens the end to the rest of the can. Each full can is lifted into the seamer for double seaming, which involves two rollers rotating around the can to crimp the end and can together. Some seamers may drop the end and seam simultaneously.
Step 7: Rinsing outside of the Cans
To prevent stickiness, the outside of the cans are rinsed to remove any spillage. The cans are then carried into a blow-off tunnel for a quick burst of air to remove any remaining water before they are dried.
For smaller microbreweries, this stage of canning production is often performed by an operator. There are several methods for depalletizing the cans on a pallet. Sometimes the issue when making a decision is financial, sometimes it is space that is limited. Let’s see the possibilities and the costs associated with investments in the acquisition of equipment.
- Use a rotating table at the entrance of the canning machine to feed the conveyor. The table must then be filled by the operator who manually handles the cans. The initial investment is low. The operating cost is high since it requires manpower. The ability to increase production is low.
- Having a semi-automatic depalletizing station makes it possible to use half-pallets and manually pull a row onto a tray. Once the cans are on the tray, it tilts slightly to lower the cans into a funnel, down to the conveyor. The initial investment is average, considering that it is necessary to have a pallet truck which allows the pallet to be mounted one row at a time, at the level of the platform. The operating cost is average since the operator must go several times per hour to push a row on the plate. The ability to increase production is average.
- An automatic depalletizer for full pallets allows the pallet to be unloaded, one row at a time, onto a conveyor which feeds a twist rinse chute, up to the canning machine. The initial investment is high. The operating cost is low since an operator only needs to enter a full pallet into the equipment for it to feed the canting line for several hours. The ability to increase production is high. A can depalletizer feed a canning line with a rate of several hundred cans per minute.
Yes, after the filling and seaming process, condensation is an issue when packaging cold carbonated beverages in aluminum cans. Problem is if the cans are packaged in cardboard boxes, the condensation can lead to the formation of mold or mildew, which can be a food safety concern. To mitigate this problem, there are a few steps that can be taken:
- Place the cans in a dry and ventilated area before packaging them, this will slow down the mildew process.
- Use a warm air dryer to dry the cans before packaging them, this will remove any moisture on the outside of the cans.
- Use a tunnel warmer to increase the temperature of the can prior to drying it with blast of air. A tunnel have a large conveyor bringing slowly the cans through a series of hot water spray.
- Use powerful air blower around the can to remove any drop of water. Drops tends to run away from the blown air and stay on the can. So you better have great adjustable arms to bring the air on the right spots.
It’s important to note that this problem is not unique to aluminum cans, it could happen to any type of packaging that contains a cold beverage.
A double-seam is essential for ensuring the protection of contents within a can. This widely-used process is used in the food and beverage industry to create a hermetic seal. Here’s a rundown of the double seaming process.
The double seam is a canning process that creates a bond between the can body and lid. This is achieved by mechanically overlapping five layers of material: three layers of the lid and two layers of the can body. This ensures the contents are kept safe from any contamination or degradation.
The Art of Can Seam Inspection
Examining the integrity of a can seam involves various techniques and measurements, which we’ll outline below based on their effectiveness and cost.
- Seam Thickness: The measurement of the finished seam’s thickness, with a specified range for each can type, helps to assess the pressure applied during the seaming process. It’s typically done with a seam micrometer.
- Seam Height: Also measured with a seam micrometer, this indicates the overall pressure applied during seaming.
- Seam Impression: As the seamer rollers join the cover and body hook materials and press against the seaming chuck, it creates an impression on the inside of the can body. Overpressure can cause damage to the liner.
- Coverhook Wrinkles: Inspecting coverhook wrinkling provides a more accurate indication of proper seaming pressure. The wrinkles that form in the inside radius of the coverhook, due to differences in radius, can be measured to assess seaming pressure and ensure proper seamer operation. To inspect, the coverhook must be removed, but manual removal with nippers is time-consuming and risky. A safer alternative is the Seam Stripper, which slits the top of the coverhook rim for easy removal.
- Double Seam Inspection: A Seam Saw cuts a notch through the seam to visually inspect and measure the various components of the double seam. Three points around the can are typically notched and checked. A visual inspection can reveal flaws in the seam, including overlap, body and cover hook lengths, and proper mating of parts. Vernier calipers can be used for measurement, but video inspection microscopes provide a more precise and thorough inspection.
Unleashing Your Beverage Empire What to Consider When Canning
Ready to take your beverage business to the next level and introduce your craft beer to the world? The canning process is a crucial aspect to consider, as even small variations in material and packaging can impact your product’s flavor, taste, and quality. Here’s a guide on what to expect and what to look for in a canning machine.
Start with Your Goals
To ensure the success of your venture, define your goals from the start. This is especially important in the beverage industry where standards need to be upheld from production to consumption. Outline your plan for distribution, the type of canned options you want to offer, and talk to experts in the field to gain insights.
Mind Your Space
Canning involves a lot of space, so make sure you have enough room for storage, organizing, and production. Consider the number of cans you’ll store, electricity requirements, necessary equipment, safety standards, and ease of loading/unloading. Plan ahead and allocate enough space to meet your production goals without creating headaches.
Budget Matters
Budgeting for canning can be unpredictable with changes in material costs, supply chains, and consumer preferences. Consider your options, whether to opt for a mobile vendor or contract canning or invest in your own equipment. If you’re just starting out, a mobile vendor may be the right choice, but for established brands, research the long-term implications of purchasing a canning machine. Don’t forget installation and maintenance costs, output speed, and the machine’s ability to keep up with your demand. Efficient machines may cost more upfront but can save time and labor costs in the long run.
Counter Pressure Craft Can Filling
Here are the main advantages of a counter pressure canning machine over the atmospheric model :
- Product flows from a pressurized tank into a pressurized can;
- Requires a slightly higher investment in filling technology;
- Minimizes CO2 loss and DO pickup;
- Offers precise control over production variables by filling into a purged, sealed container and using easily-adjustable machine parameters;
- Allows for greater flexibility in product range, from still to high-carbonation (up to 4.1 vols) and is less impacted by temperature variations;
- Is the preferred filling method for high-production environments.
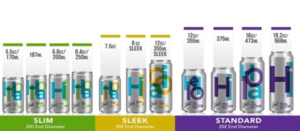
In North America, aluminum cans are a popular choice for packaging beverages due to their durability, lightweight, and recyclability. There are several sizes and types of beverage aluminum cans, each serving a different purpose and market segment. Here are the most commons beverage can sizes and types.
When searching characteristics of a good canning machine, it’s important to consider the following characteristics:
- High speed and efficiency
- Durability and reliability
- Easy maintenance and cleaning
- Accurate and consistent seam quality
- Versatility and compatibility with various can sizes and shapes
- User-friendly interface and controls
- Safety features for operators
- Energy efficiency and low operating costs.
These features ensure that the machine is able to perform efficiently and effectively, providing a tight and leak-proof seal for all types of canned products. A good canning machine should also be designed to meet the needs of the specific operation, taking into account factors such as can size, production volume, and budget.
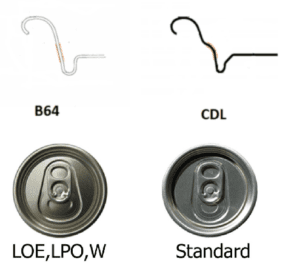
B64, CDL, Super End, and LOE are types of can ends that are commonly used for packaging beverages in aluminum cans. They differ in the design and construction of the can end, as well as the type of opening mechanism.
In the North American beverage industry, it is very common to see SLEEK, SLIM and STANDARD cans using a 200 or 202 size of can end.
The Counter Pressure Filler, also referred to as an Isobaric Filler, is a machine designed for the purpose of filling containers such as bottles or aluminum cans with carbonated drinks from a pressurized or non-pressurized bulk storage tank without causing a loss of carbonation. This tool is used by manufacturers of sparkling wines, soft drinks, and brews for bottling their products for retail sales. To operate this device, you will require a primary storage tank suitable for carbonated drinks, a chiller, CO2 storage bottles, and a carbonating unit that can either be integrated with the primary storage tank or function as a separate entity.
The counter pressure filler operates by filling the container through a top-mounted filling tube that is fitted with a diffuser to distribute the liquid evenly around the walls of the container and minimize foaming. The center of the tube features a smaller return tube that allows CO2 to escape to the top of the filling tank, thereby enabling more product to fill the bottle.
An alternative, less commonly used method in automated filling equipment due to its cost and complexity, involves filling from the bottom using a long tube that reaches the bottom of the bottle and a crown seal that secures the bottle once it is filled. Both the CO2 and drink supply lines are connected to the filler, and a vent is included to allow for the release of gas during the filling process. Valves on each input and the vent allow you to control the pressure and speed of filling and venting.
It is very common to see, in the micro-canning industry, machines using pneumatic seaming systems. The main reason is that it is an inexpensive system to manufacture. On the other hand, it is not the most reliable system to execute a precise and constant seam. The use of compressed air, to move the rollers towards the chuck during the execution of the seaming, does not offer consistency. For some, this system may be sufficient, but let’s not forget that no high-speed canning machine uses this method. It must be for a reason! GX Canning believes in offering a superior quality system to perform can seaming. After all, it’s not a common operation. This is what guarantees your product will retain its CO2 in the can. A bad seam allows CO2 and liquid to leak out of the can, sometimes several weeks after production. In addition, this method does not spin the can on itself at high speed, greatly reducing the projection of product. Contact us to learn more about our mechanical seamer.